Secrets of the Seated Twist
Side-sitting, back-lying, and side-lying. Beginning and ending with classic Feldenkrais explorations of twisting while side-sitting on the floor, this lesson is designed to make side-sitting more accessible, and to free your torso and hips. Alterations – including chair-seated – are discussed, and long lying down portions of the lesson reveal how folding and arching can improve turning and twisting.

Please limit your twisting movements carefully. “As far as is comfortable” is always implied even when you’re asked to twist as far as you can.
This position is called left side-sitting
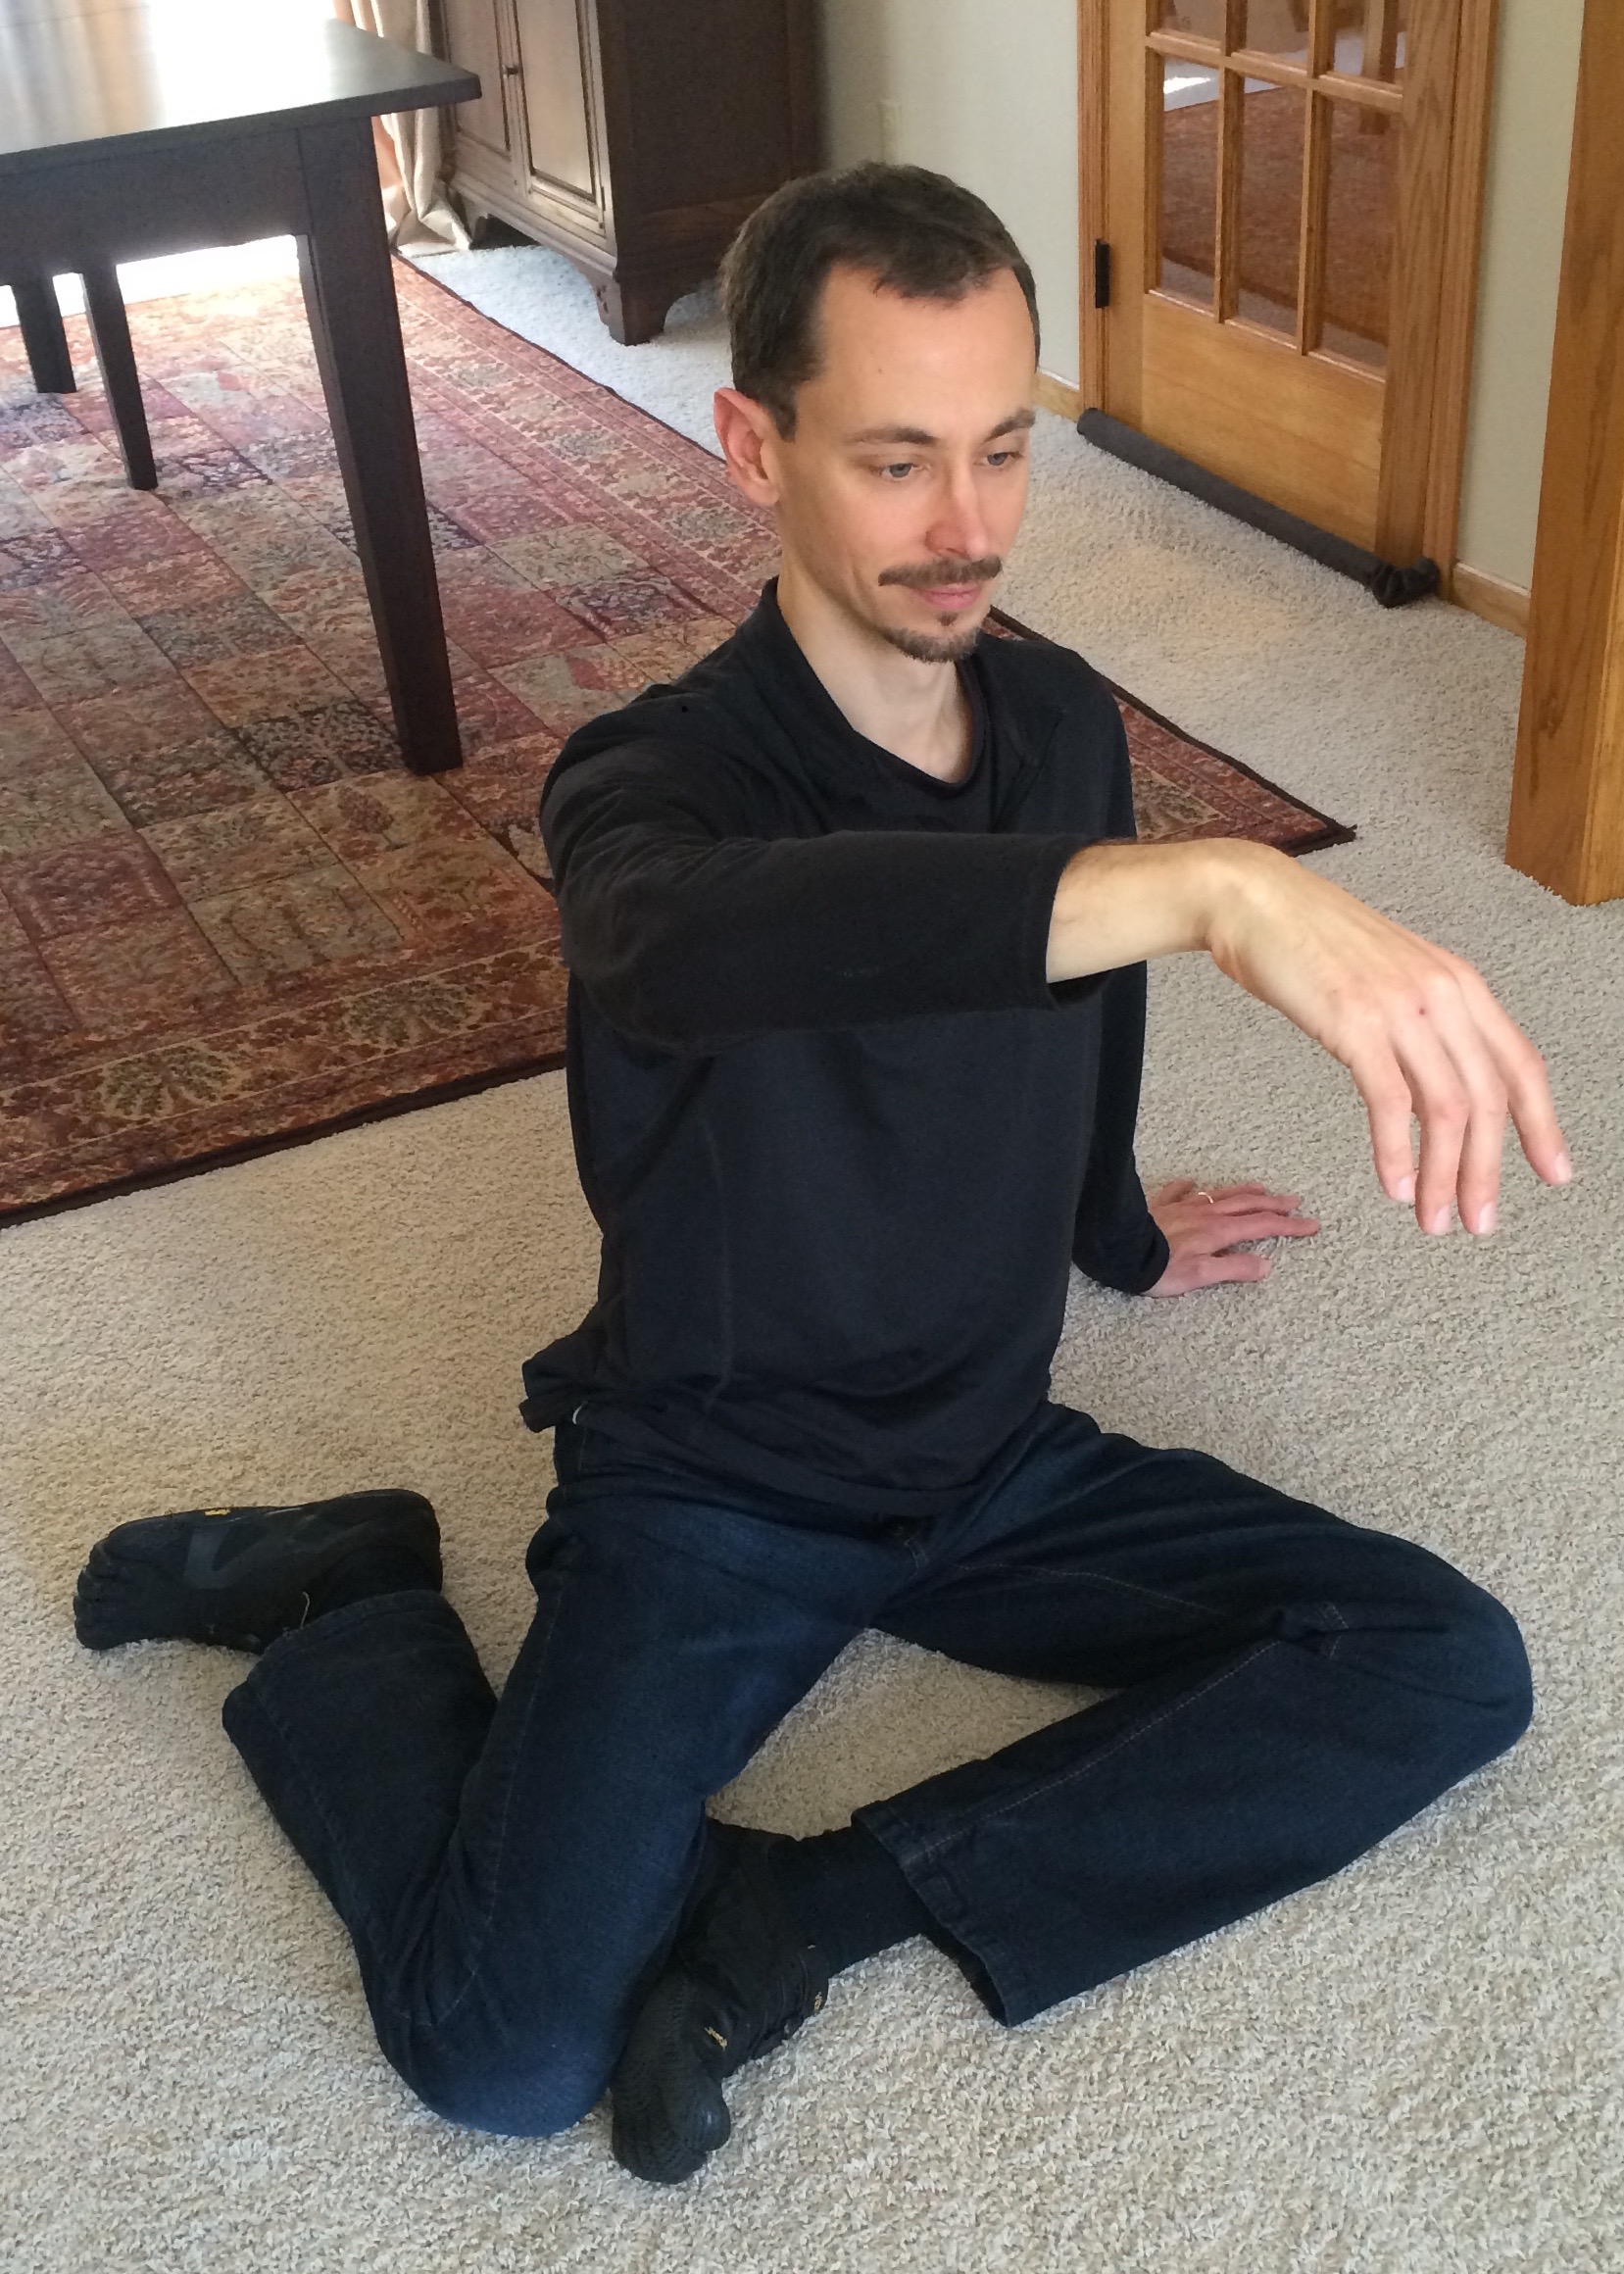
Note that the thighs are separated, with one foot near the other knee, the other foot somewhat behind.
You can sit on a few inches of folded bath towel if needed, to make side-sitting easier for your hips, pelvis, and back. You might also wish to add height under your support hand if needed. You could also lean on your fist at any time instead of your palm.
While everyone experiences differences between their sides, if side-sitting one way is particularly challenging you can always choose to reverse my lefts and rights, or stay on the same side when I ask you to switch, or lie down and imagine the more difficult side.
Chair option: If necessary it is also possible to do all the seated portions of this lesson sitting near the front of a firm, level chair, with the knees and feet comfortably wide apart, tipping the knees to the side you are turning to, and shifting the weight onto that side’s sitbone while you twist in that direction.

Got a question for Nick, or a thought about this lesson?
Use the comments section below! Public comments build our community and help search engines find us.

12 Comments
Leave a Comment

These icons are part of "My Journey," where you can make lists of your own saved and favorite lessons, courses, and talks.
To access this donor benefit login below or Join the Project
Click here if you need to reset your password
Hello, I so enJoyed this lesson! ThankYou! I did one half last nite (didn’t have time or energy to complete it;) and then tonite did an ‘abbreviated’ first half again and finished it all.
Was Wondrous!
Almost always feel good (+’better’) after a ‘Feldy sessh’—but it doesn’t seem (seem being key word perhaps?) to affect my daily life+movements+feelings of ‘freedom’+grace’ and the like—but maybe I just don’t notice the ‘effects’ ?? (Also, wish lessons could be shorter in general—why are Feldnkrs lessons always so long ??
(Also, I appreciate the free lessons as I cannot afford to pay yet) Thnx again!!
Thanks for commenting! We intend there to be ample free lessons for a rich education for all – that’s our vision. To answer your questions:
• Regarding length, something happens neurologically around 45 minutes into Feldenkrais study that’s very potent for learning, so I tend to prefer long form classes. But shorter study is great too, and of course you can break up lessons like you have. You probably saw the shorter free lessons in Getting Oriented. There are a bunch more you can preview in Patrons Monthly, should you decide to become a Patron sometime.
• Regarding how long lessons “last”, it sometimes takes a fair amount of experience with the work to sense yourself making different, easier choices in your life’s movements spontaneously. If you’re already experienced, then more conscious engagement with this quality of movement and attention in day-to-day activities may be useful: light housework like doing the dishes, laundry, etc. are my favorite activities for “making a lesson out of life”. Another thought: doing two or more lessons per week, or at least improvising/practicing from memory a little bit every day or two in between weekly full-length lessons should help. Finally the sequences in many of the collections can help, as often each lesson builds pretty directly on the next.
A lovely gentle lesson.On my first twist I felt I reached a barrier,but on the final twist I floated off towards the horizon feeling a remarkable amount of movement throughout my whole body.
Ann Thomson
What a brilliant lesson Nick! I had spent the day redecorating my studio and painting the walls, so hard work and my body was feeling quite exhausted and stiff by the end of the day. Then I did your lesson, and it was like having a massage: it gently eased my chest, arms, and hips till they were once again supple and stress-free. It was so beneficial, I listened again the following day! Thank you so much!
I really enjoyed this lesson, thank you Nick. I like the longer lessons 🙂
Have a wonderful sense of exhilaration with that opening of the chest from the sternum. I am quite twisty so this adds a missing dimension and perhaps some relief for my spine.
Such a great evolution of the classic lesson Nick.
I have been studying Seated and twist left AH in preparation to teach it and initially I thought where is Nick going with this side lying section? but afterwards it transformed the movement of twisting, through this agility in the spine. Just great. Thank you!
I’ve observed so many students struggle in this lesson over the years that I felt we had to innovate! By taking folks out of upright gravity for a period, the spine and torso habits become much more plastic. Feldenkrais basics to the rescue, right?
I used to do the side-lying bit as a full preamble lesson, but I realized they could be combined.
I have just repeated the lesson and I think you are absolutely right. So many students to sit in side saddle for 50 minutes a counter productive struggle can so easily happen.
The side lying sternum interlude is fascinating and has inspired me to instead of teaching the single classic “turn to the left lesson”, to dissect it into a 2 or 3 lesson workshop morning workshop.
Thank you for providing such a rich resource for those of us learning to teach.
Thank you for this lesson. It actually brought me to tears!
This was my first ever seated Feldenkrais session and it was marvelous. I did it a after the selected session for today, because I felt my sternum could use some more attention (I‘ve focussed on neck, shoulders and jaw because those are the most tense parts). Sitting engages the attention in a funny, curious way. My movements are a lot more free, easy and restful now. When I lie on the back now, I feel the upper body pouring into the ground which gently tells my stiff neck that‘s it‘s ok to let go, too. Very interesting. It‘s definitely one of my body parts that I didn‘t have much awareness of before.
This is fun to hear! It’s easy to think of the Feldenkrais Method as being all about lying on the floor – that’s a common first understanding. And the floor is often best for making our habits malleable. But upright lessons can connect the dots to the rest of our life very directly. You might enjoy using our lesson filter to find more seated lessons. If you scroll down to just before the comments, you’ll see “To browse all lessons by position.” Try clicking to see all the lessons that include sitting!